

Menu
A stand-alone scanner/photocopier/printer is known as a MFD (Multi-function Device). These are network connected devices that don’t require any TWAIN driver software installing on the PC to make the scanner operate. The scanner will store scanned documents into specified folders on the network.
Volume can be configured to detect scanned documents in these network folders. When a scanned document is created by the MFD, Volume will detect it and import it into the '...pages to be placed' area. Once imported, the scanned document contained in the network folder will be deleted. The network folders that Volume watches are referred to as ‘Hot Folders’.
Hot Folders can be configured in Volume by following the below guidelines. Volume 5.6.3 allows multiple hot folders to be configured. Previous versions of Volume only supports the configuration of two hot folders.
There are two ways to configure a Hot Folder:
The MFD will need to be configured for each user in order to identify their scanned documents. This is so the scanner places the scanned documents for that user into their relevant Hot Folder network location. Contact the MFD supplier on how to do this.
To configure the Hot Folder in Volume, select 'File' and then 'System Setup'.

From System Setup select ‘Jump\Remote Scan’ tab and select the plus button.
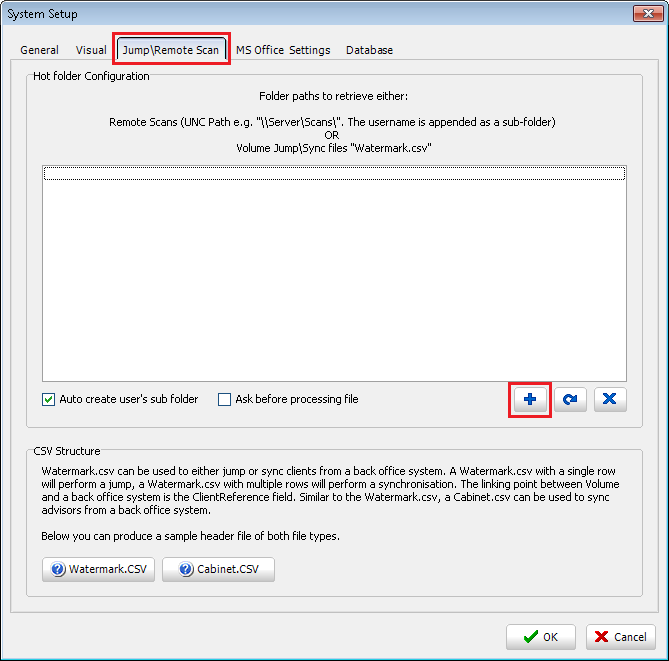
Enter the root path of the shared network folder as a UNC path. The path does not need to include the specific user's sub folder as this is automatically added by Volume.

Please Note: This network folder should have full permissions. As it is only a temporary folder, no permanent data will be held there.
Click ‘Create sub-folders now’ to create all user's sub folders within the shared network folder location based on the current list of users in Volume.
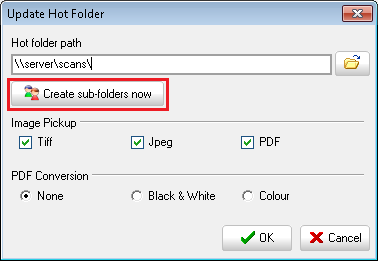
Tick the specific document types to be imported into Volume from the network folder.

It is recommended to set the scanner to Tiff for black & white and Jpeg for colour.
If the scanners creates PDFs, these can be converted to black and white Tiffs or Colour Jpegs by selecting the appropriate PDF Conversion settings. This will allow these documents to be viewed in Volume without the need for a PDF reader to be used - such as Adobe Reader. PDF documents can be left in their original PDF format by selecting 'None'.
Please Note: Colour PDF conversion is only available from Volume version 5.6.3
Select OK to save the settings.
8
Tick the option ‘Auto create user’s sub folder’ to automatically create the Volume user's sub folder within the shared network folder location. The sub folder will be named after the user's Volume username. The MFD will need to be configured to make use of any new sub folders created.

Tick ‘Ask before processing file’ for scanners that close and reopen the document file as pages are added. For these type of scanners, Volume will not be able to recognise when the document file is complete and the scanning process has finished. When this option is selected, the user is prompted first to confirm the document is ready to be imported into Volume.
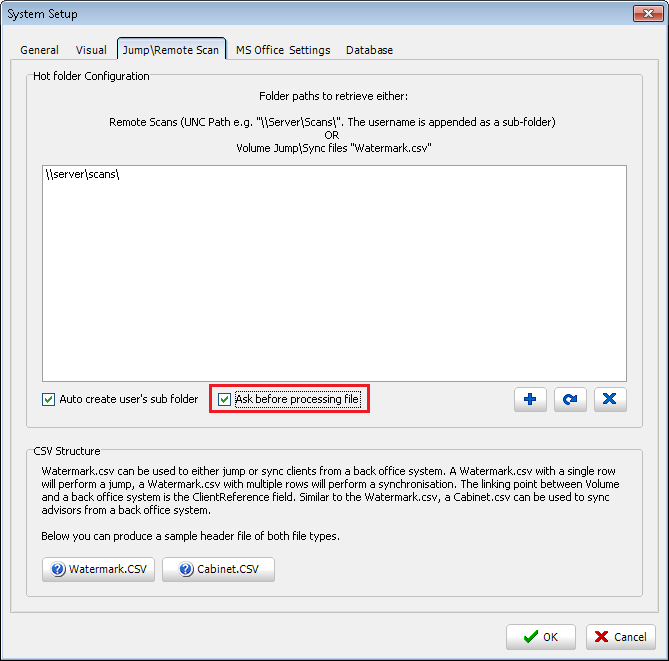
Use the Edit and Delete buttons to make changes to existing hot folders and delete hot folders which are no longer required.

The MFD (Multi-Functional Device) can be configured in a few different ways depending on requirements and its capabilities.
It is important that the correct compression and file type are selected otherwise Volume will not process the images. The TIFF file format can produce a single file containing multiple pages and should be selected in the options. This format will keep the pages in order. CITT Group 3/4 compression type is supported which will produce simple black and white images (not grey scale). LZW is also supported for TIFF where both black/white and colour images are both supported in the same multi-page file. If LZW is not supported then JPEG can be used. This must be set to True or Full colour.
Grey Scale is not fully supported so may not work correctly.
Some testing may be required to select the appropriate compression and image format. Your MFD supplier will have information on how to configure the scanner output.

