KB015 - Details on how to remove empty tabs and rows from client files
1.
Only empty tabs can be deleted from inside a file and only empty rows can be deleted from inside a tab.
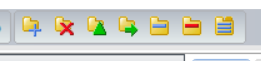
This toolbar will appear adjacent to the menus when a file has been selected. Depending on the user’s restrictions, certain buttons may not appear as they do in this example.
2.
Button 1: Adds a Tab Button 2: Deletes the currently selected Tab Button 3: Modify currently selected Tab properties Button 4: Move the selected Tab to a different Client File Button 5: Add a new Row Button 6: Delete the currently selected Row Button 7: Apply a Client File structure Template
3.
Each row has its own delete button to the far right labelled with a ‘x’. This will only delete its accompanying row, if it is empty.
KB017 - Download Files to View Outside the Office (Extract)
A copy of electronic files held in Volume can be taken away from the office in two formats. The first is as a mini database where Volume is required to have been previously installed, or as volumeAnywhere where all the software required to view the files is included.
* See volume portal as an alternative to this process.
Access to Extract Data may be restricted in User Maintenance for none superusers.
1
Start the process by selecting 'Extract Data' under the 'File' menu.
2
Select the files you wish to include in the extraction process. A list of clients can be built up to includes as many clients files as required:
3
Click “Next”
4
Now pick the destination, username and password, a date for the data to expire (if required), and the desired extract type:
“VolumeAnywhere” - Picking this option produces a Firebird database and associated application files to allow users to view data on the go. The resulting output can be run locally, copied to a USB stick, or burnt to optical disks.
“Database Only” – Picking this option produces a Firebird database only
5
Click “Finish” to start the export process, once completed a message is displayed to advise the export is completed:
6
There are no external files to the database created on the destination medium, such as, TIFF, JPEG, Word, etc. All data is held inside the mini database.
The extraction process may not work in certain types of remote desktop environments such as Citrix or Terminal Services. In this situation, it is recommended the extract is performed directly on the data server where the Volume database is held.
volumeAnywhere is read-only and available to a single user and cannot be run over a network.
volumeAnywhere is a snapshot of data. It cannot be synchronised with the live Volume database. It does not install anything or leave any temporary files on the recipient’s machine.
KB018 - Enable version control and stacking on emails
This option is only available if Microsoft Office Integration is enabled. Contact support@watermarktech.co.uk for further information if you do not have Office Integration turned on.
Email reply stacking is available in Volume from version 5.5.1.4. It is optional and switched off by default.
Replies to existing emails held in Volume are stacked on top of each other. The original email must have been stored in Volume when this option was already switched on.
1
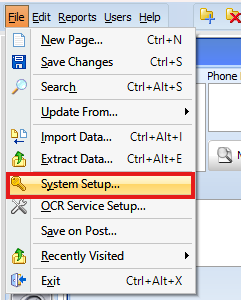
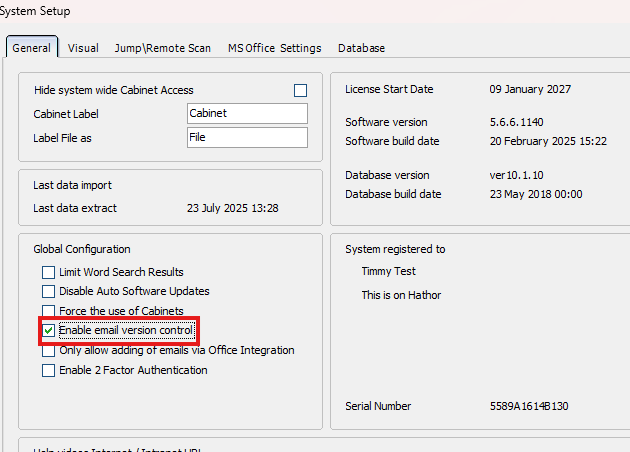
To switch on this option, in the File menu, open System Setup.
In the Global Configuration group, tick ‘Enable email version control’. Volume will need to be restarted for the changes to take effect.
2
New email chains will now only create one page inside a document box.
The Outlook toolbar may look different depending on what version of MS Office is installed. Later versions will have a ribbon component.
In Outlook either using Store or Store & Keep the email is stored in Volume in the normal way. When a reply to the original email is stored a new version is created in the document’s page.
In this example the email has had one reply. The email version details are shown at the bottom. ‘v2’ refers to the fact that this is the second email in the chain. Note that if the latest email was stored 5 days after the previous versions creation date and the page position was greater than 4 pages the email will automatically jump to the left most position within the document.
3
Right click on the page to open its Version History.
4
All historic versions of the email chain are listed here.
KB024 - Configuring the Fujitsu FI-6130 in Volume
1
Install the TWAIN interface driver that came with the Fujitsu scanner and then attach the scanner to the PC. Follow the scanner instructions on how to do this. Test the scanner is working in Windows.
2
Click on the New Page icon in Volume.
3
Select Scanner Setup.
4
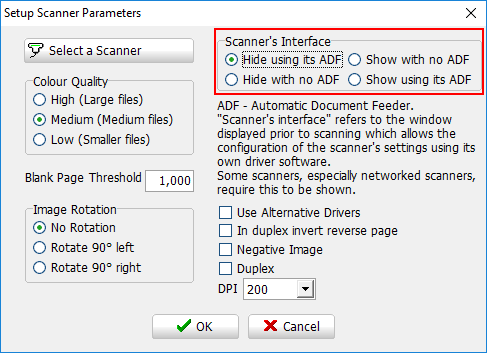
Select ‘Show using its ADF’ and then click ‘Select a Scanner’.
5
Select the Fujitsu driver ‘FUJITSU fi6130’. Do not select the Windows driver ‘WIA-fi 6130’. These Windows drivers usually start with WIA.
Once selected, click 'OK' in the ‘Setup Scanner Parameters’ window.
6
In the ‘New Page Entry’ window click 'Scan'. This will show the Fujitsu scanner’s interface.
7
Click the 'Option' button to show the Option window.
8
Select the ‘Job/Cache’ tab and change ‘Multifeed Detection’ to ‘Check Overlapping (Ultrasonic)’. This will check for multiple pages being fed into the scanner at the same time.
Click 'Scan' to accept the changes and perform a test scan.
9
The Fujitsu scanner's settings are currently set to show each time a document is scanned. To turn this off, go back to the ‘Setup Scanner Parameters’ window and set the Scanner's Interface to ‘Hide using its ADF’.
KB029 - Guide to installing Volume on a Client PC
Depending on Windows permissions the installation may need to be run as the local administrator.
Input the download details provided for installing,
Click the install button, you will now have the installer MSI.
1
Navigate to the installer and run it.
By default the installation path will be set to, C:\Program Files (x86)\WatermarkTech\volumeFINANCE
2
Select the installation type as, Client/Work Station.
3
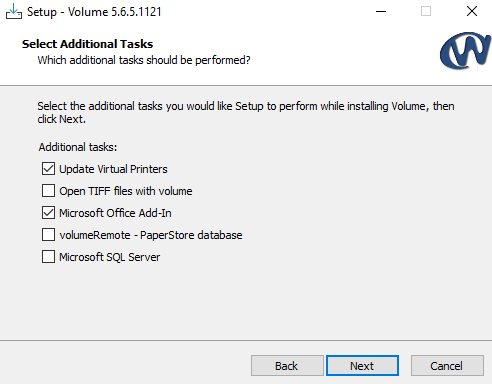
In the 'Select Additional Task' screen, the ‘Install Virtual Printers’ will be ticked by default.
Select ‘Open TIFF files with volume’, if you would like to associate files with *.tif extensions with Volume. When a TIF image is double-clicked in Windows it will be imported into Volume.
Select ‘Microsoft Office Add-In’ to allow the installation of Volume to integrate with your Microsoft Office Suite.
‘volumeRemote – hosted database’ should only be ticked if your Volume solution is hosted by Watermark - Volume Remote. A blank volumePaperstore.ini file will be created for you to add the connection details to in, C:\Program Files (x86)\WatermarkTech\volumeFINANCE\..., to obtain the connection details, please contact Watermark Support. Alternatively, if you already have a volumePaperstore.ini file, leave the box unticked and copy your existing file into 'C:\Program Files (x86)\WatermarkTech\volumeFINANCE'
‘Microsoft SQL Server’ should only be ticked if this database system is in use. MS SQL Server is an alternative to the default database system - Firebird.
Once the installation is complete Volume will need to know where the database is located to allow you access to it.
In the case of volumeRemote (hosted) you should have been provided with a volumePaperstore.ini file to copy to the default installation folder. In the case of Microsoft SQL Server launch Volume and a prompt is displayed to enter the database alias and server name. Contact the individual or organisation that is responsible for your IT support for this information.
For normal local office-based installations, there are two methods to connect to the database on the server.
Method 1
Browse across the network to the server that holds your Volume database.
Navigate to the Volume database folder and double click on the database file whatnopaper.fdb
Your new client installation will then establish a connection with the server and remember it going forward.
Method 2
Create a text file called volumeAcuutech.ini and save it into the installation folder for Volume on the client.
E.g. c:\program files\watermarktech\volumefinance\volumeAcuutech.ini
Now launch Volume and enter the database alias (default is whatnopaper) and server name. This will populate volumeAcuutech.ini which can then be copied and used for other installations.
For clarification on which of the two methods to use and what your database alias and server name are called, contact the individual or organisation that is responsible for your IT support.
For Volume Remote Installations
Obtain a copy of the VolumePaperstore.ini file from Watermark Support and then place this in the same file location as the client installer file and run it, the installer wizard will then copy and apply the VolumePaperstore. ini to the volumeFINANCE directory.
KB025 - When using the scanner, images are being cropped
This issue can occur with scanners that are TWAIN compatible as opposed to being TWAIN compliant. TWAIN compatible scanners can ignore some of the commands that Volume sends to it resulting in cropped images. To resolve this issue, the scanner can be set to use its manufacture's driver software in Volume.
To control the scanner using its driver software (TWAIN Interface), set Volume to open the scanner’s interface prior to each scan.
1
Click 'Scan and Add documents' from the left hand side menu bar.
2
Click 'Scanner Setup'.
3
Set the Scanner’s Interface to ‘Show using its ADF’.
Each time the 'Scan' button is now pressed in Volume, the scanner’s TWAIN interface is shown. This will correctly control the scanner using the scanner’s manufacture software preventing cropping.
KB028 - Importing documents created by a scanning bureau
This article details how to import TIF images supplied by a scanning bureau which has used software external to Volume to create the images.
Please Note: Only TIF image file types are supported. The TIF image file format must be a standard image type compatible with Volume. It is recommended that test images are produced before the scanning process begins to make sure the image type is compatible with Volume.
Scanned images are only supported with an accompanying CSV file: -
Filename, ID, First name, Surname, [Optional address: line 1, line 2, line 3, line 4, line 5], [Optional postcode]
Please note the following regarding the CSV file: -
Address and postcode are both optional and one can exist without the other.
ID is the Volume file ID and not the reference number.
Group all the images for the same file ID together in the CSV file.
Use 0 (zero) as the ID for new files.
A path is not required with the filename.
The CSV file should not have any headers.
The CSV file needs to be saved with the prefix 'WATERMARK_xxxx.csv'. The xxxx section can be defined by the user.
1
To locate the Volume file ID for each file, select 'Reports' and then 'Mailing Lists' to produce a complete file list from Volume. Each file listed in the report will includes its file ID.
See knowledge base document here for further information on how to do this.
2
Place the CSV file in the same folder as the TIF files.
3
Select 'File' and then 'Import Data'
4
Select the CSV file to import and then click 'Import'.
5
Specify the default Tab and Row that the documents are to be placed into.
Click 'Import' to begin the document import.
KB026 - Importing Client details from a CSV file
Client file names and their associated details such as address, phone numbers, etc can be imported from a CSV file generated by another system, for example an Excel spreadsheet.
A CSV (Comma Separated Value) file is a text file list. Each field is separated by a comma. The list can contain an optional unique ID for each file, for example Client Ref. If an ID is included the CSV file can be imported a repeated number of times to keep Volume’s file list up-to-date with the third party data source.
E.G.
Client Ref, First Name, Surname, Address Line 1, Address Line 2, Address Line 3, Address Line 4, Postcode,
A10000187, John, Smith, 1 Town house Lane, Breeston, Bristol,, BS12 1SD, 01423 555818, 07999 555152,,
A10000188, Peter, Smith, 2 Town house Lane, Breeston, Bristol,, BS12 1SD, 01423 6161616, 07999 555153,,
A10000189, Mary, Smith, 3 Town house Lane, Breeston, Bristol,, BS12 1SD, 01423 7171717, 07999 555154,,
A10000190, Susan, Smith, 4 Town house Lane, Breeston, Bristol,, BS12 1SD, 01423 8181818, 07999 555155,,
A Profile is a previously imported CSV which defines how the data in the CSV maps to the data fields inside Volume. Multiple profiles can be created. Profiles are stored in current user’s Windows registry and are therefore not globally accessible by other users.
1
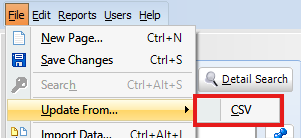
Navigate to to the 'Update from... CSV' tab in the File menu.
2
Click ‘Open Profile’ to open/modify a previously created profile or create a new one.
To open a previously created profile the CSV file must exist in the same place and the filename must be the same as the originally imported CSV file.
3
System Data Fields list all the default fields held in Volume. These are to be mapped to the fields contained in the CSV file.
All are optional but a Surname should be included as a minimum. If the file is none client based, e.g. a company name, use the ‘Company Name’ field instead of the Surname. ‘Company Name’ is the same field as Surname and is included for clarity.
Although the Unique ID is optional, it is recommended that one is included so future imports of the CSV will update file details for existing files held in Volume. The Unique ID is used to identify the file and keep it unique.
All fields listed after Email are custom fields created in ‘Definable Data’ found in the Edit menu.
4 Importing
Open the CSV file to import.
CSV data fields are then listed in the ‘Data Fields To Import’ column. These are the headers found in the CSV file in the first line.
If the CSV file does not contain a header untick the ‘Header Record’ check box. This will include the first line of the CSV file as data, not titles.
Two arrow buttons appear to the bottom left. These will cycle through the data held in the CSV file. These are also useful to verify if fields are correctly labelled and match the system data fields held in Volume.
In this example the first line of the CSV file is data – ‘John Smith’
5 Mapping Values
To map data fields select the title from the left (Volume) and the title from the right (CSV) then click Join.
The selected fields are moved to the ‘Matched Data Fields’ list.
Continue this process of matching fields until all are satisfied. Use the ‘Header Record’ check box to verify data fields when required. Any fields not matched will be ignored by the import.
4
If this is a new import enter a new profile name.
5
If more than one CSV file is to be imported and there is a chance that the Unique ID is not unique between CSV files an optional prefix for the Unique ID can be entered. For example: Clients10001234
6
Click OK to save the profile.
7
An optional Cabinet can be selected to import the CSV file into.
Click ‘Start Import’ once everything has been verified.
It is recommended to take a backup of the database before starting the import.
KB027 - Import files into Volume using scanning bureau KGS
KGS are a Volume recommended scanning bureau. Their scanning process produces import files that are compatible with Volume and can be imported directly into previously identified client files held inside Volume. This process is fully automated.
Before the scanning process can start, a full client list must be supplied to KGS. This is produced using the Mail List option within Volume. See Knowledge base document here for more information on how to do this.
New files can also be imported that do not already exist in Volume.
Once KGS have completed the scanning they will supply an import file.
Please Note: It is recommended that a backup of the database is taken before importing.
1
To begin the import process, select 'File' and then 'Import Data'.
2
Point the path to the FDB file supplied by KGS and click 'Import'.
3
When the import is complete, updated and new files will appear in bold for 24 hours in the Volume search list.
KB059 - Common errors reported when using the Firebird database
Below are a list of common Firebird database errors which may be reported when logging into Volume. If an error is reported, please follow the guidelines below in order to rectify the issue.
Unable to find the database. Your network may be experiencing problems. Check with your system’s administrator
This is a generic message reported when the Volume client is starting up. It is indicating that Volume failed to communicate with the Firebird database. Clicking 'OK' will usually return one of the detailed error messages below.
ISC Error Code:335544344 - I/O error during “CreateFile (open)” operation for “WHATNOPAPER”
The volume client has connected to the Firebird database, requesting a connection to the “WHATNOPAPER” database. The database server does not know how to find the WHATNOPAPER database.
The Firebird aliases.conf file may be missing or invalid. The file should contain a line similar to WHATNOPAPER = D:\volumeFinance_Database\WHATNOPAPER.FDB. Check that the name and path of the database is specified correctly in the aliases.conf file.
ISC Error Code:335544344 - I/O error during “CreateFile (open)” operation for “...WHATNOPAPER.FDB.delta”
The delta file is missing on the database server.
This may occur after moving or restoring a database. Check to make sure the delta file has been moved to the correct location on the database server. If you are sure that the database is not missing a valid delta file, use the “Activate” button in volumeAdmin to mark the database as ready.
ISC Error Code:335544721 - Unable to complete network request to host "xxxxx"
Volume is unable to connect to the database server.
The Firebird Server service on the database server may not be running, the network may be down or the server has a firewall blocking the connection. The clients must be able to contact the server on TCP port 3050 to establish a database connection.
Please wait, trying to connect to the database...
The Firebird database is unable to locate the FDB database specified in the aliases.conf file or does not have permission to read the folder containing the FDB database file.
To provide the best experiences, we use technologies like cookies to store and/or access device information. Consenting to these technologies will allow us to process data such as browsing behaviour or unique IDs on this site. Not consenting or withdrawing consent, may adversely affect certain features and functions.
Functional
Always active
The technical storage or access is strictly necessary for the legitimate purpose of enabling the use of a specific service explicitly requested by the subscriber or user, or for the sole purpose of carrying out the transmission of a communication over an electronic communications network.
Preferences
The technical storage or access is necessary for the legitimate purpose of storing preferences that are not requested by the subscriber or user.
Statistics
The technical storage or access that is used exclusively for statistical purposes.The technical storage or access that is used exclusively for anonymous statistical purposes. Without a subpoena, voluntary compliance on the part of your Internet Service Provider, or additional records from a third party, information stored or retrieved for this purpose alone cannot usually be used to identify you.
Marketing
The technical storage or access is required to create user profiles to send advertising, or to track the user on a website or across several websites for similar marketing purposes.