KB005 Guide to backup data manually when using Firebird database software
This document is only applicable to installations that use the Firebird database software.
Backups should normally be automated where a Windows’ scheduled task takes a snapshot of the database every night. It is the snapshot that is then copied to the external media such as a USB drive. Refer to the Knowledge Base document ‘Reinstall / Upgrade Volume to a Server’ for further details on how to configure a server installation of Volume.
The backup will be created
Sometimes a manual backup is required where a copy of the database is taken to an externally USB connected hard disk drive or memory stick.
It is very important that the database is not backed up directly while the Firebird service is running. Doing so on a live database will corrupt the copy and potentially the database as well.
1.
On the server, open volumeAdmin.exe by navigating to this file location:
Click the Backup button, select the location of where to make the backup to and then select the database file.
The database is usually called whatnopaper.fdb. Consult the individual or organisation responsible for IT support if in any doubt of file locations.
If the database is held on a virtual machine, tick the option to ‘Disable Direct Disk Access’ to speed up the backup process.
3.
Select a location to create the backup file to.
Once this location is chosen, you will select the .fdb you wish to back up.
The backup will now commence. It will complete when the command prompt window disappears.
KB006 - Explanation of backup snap-shots on Firebird database software
This document is only applicable to systems where the Firebird database software is used on the server.
Backup files are a snap-shot of the complete database and usually have the extension NBK.
When the database grows, it takes more disk space than it actually requires.
This additional space is filled until more space is required.
At this point the database will increase in size, taking up more space. This cycle is repeated.
KB056 - Backing up a Firebird database
This article explains how to configure and test a Firebird database backup. This document is only applicable to installations that use the Firebird database software. During the backup procedure a snapshot of the Firebird database is created which can then be backed up using the normal server backup medium.
Please Note:
A Firebird database should never be directly backed up and should be excluded from the main system backup. Veritas, BackupExec, Symantec, etc can corrupt the database if attempted.
If using any other backup method other than the one specified here, never try to backup/copy a Firebird database directly whilst the Firebird Server service is running on the server. This will corrupt the database copy and potentially the database. The Firebird Server service can be stopped using the Firebird Server Manager found in Control Panel or by using the Windows Service Manager.
Corruption to the database may occur if the database is approximately 100GB or more in size and it is being copied to an external USB hard disk using Windows XP. Other commercial file copy applications are available that do not have this restriction. This issue is not apparent on Windows 7 or above.
1
Browse to 'C:\Program Files (x86)\Watermarktech\volumeFINANCE\' on the server and double click on 'volumeAdmin.exe'. If the server is running in a virtual environment, tick 'Disable Direct Disk Access' to improve performance. If the server is using physical disks, leave this option unticked.
2
Select the 'Backup Batch Files' tab.
3
Make sure the volumeAdmin.exe location path is correct and also specify the location of the backup. Check the database Alias at the bottom to make sure the correct database is selected for this backup. This will only apply if the server has multiple databases.
4
Click 'Create Batch File' and save the batch file into the same location as the backup. This batch file will launch volumeAdmin.exe and create a snapshot of the database in the destination folder.
5
Create a Windows Scheduled Task to call the backup batch file at an appropriate time to complete before the main system backup takes place. Timings for this may need to be adjusted in the future as the database grows in size and therefore the backup takes longer.
Please Note: Always test the backup procedure from the Windows Scheduled Task by right clicking on it and selecting Run. Also check that the task will run successfully when not logged into Windows and pick a Windows account that is not likely to change in the future.
A *.nbk file will appear in the relevant backup location upon successful completion.
Please Note: To prevent corruption of the Firebird database, make sure its location is excluded from any AV software installed on the server and also that it is excluded from the main system backup. Only the *.nbk file created via the batch file should be backed up as part of the main backup.
KB007 - Configuration steps to configure a blank page threshold to remove blank pages
When a document is scanned, dragged & dropped or virtually printed into Volume each page created is measured by its size to test if it considered blank or not before being saved into Volume.
1
Click on an image inside a document box to view it full screen.
Its size is shown in kilobytes in the title bar. In the above example this image is 25KB in size.
When blank pages appear their size is larger than the ‘Blank page threshold’ previously set in Volume. The default size is 1.75KB. This value can be altered in the scanner setup window.
2
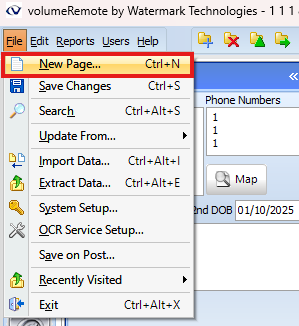
Select from the menus select ‘File’ then ‘New Page’.
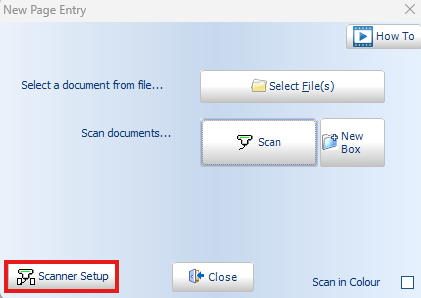
Click the ‘Scanner Setup’ button.
3
The value is entered is in bytes. Divide it by 1024 to convert to kilobytes (KB).
Be aware that if the blank page threshold is set too high then genuine pages that contain information may be rejected as blank pages.
Usually when blank pages appear it is because the scanner’s settings require adjustment. If black lines appear on the page edges most scanners can trim the image’s edge by a couple of millimetres. Set ‘Show using its ADF’ option as in the above example to see the scanner’s interface options when to scanning.
Blank pages threshold does not work for colour images.
Virtual printing and Drag & Dropping of image files are also affected by this value.
KB009 - Guide to using USB Scanners in Citrix
USB Scanners in Citrix.
1
Minimum Citrix Xen Desktop version requirement is v5.5.
Minimum Citrix Receiver is v3.0 as their Citrix online plugin.
Enable the HDX user policy Client TWAIN Device.
2
Having USB redirection also switched on will cause a conflict for Xen Desktop when it tries to use the scanner device from both policies. In this case, either disable ‘USB device redirection’ or deny the redirection of only the scanner via USB by updating the ‘Client USB device redirection rules’ HDX policy as shown below:
3
For example, to redirect a scanner with Vendor ID (VID) of 1234 and Product ID (PID) of 9876, add the following rule within the DDC HDX policy.
4
The VID and PID of a device can be obtained from Device Manager, under the Details tab of the device Properties.
#
KB073 - Use Volume's Copy to Clipboard function to copy documents into external applications
The Copy To Clipboard option in Volume allows documents to be copied out of Volume into the Windows Clipboard. The documents then become available to be pasted into external applications such as Outlook. The documents can also be pasted onto the Windows desktop or within Windows folders. This option is available from version 5.6.0.6 of Volume.
JPEG and TIFF documents are converted into PDF documents when using this feature. Multiple JPEG and TIFF documents selected at the same time will be combined into a single PDF document. To reduce the overall size of the PDF document, an option appears during the conversion to change colour images into black and white images. Other types of documents will maintain their original file type when being copied.
1
To copy all documents contained in a box, right-click on the box and select Copy to Clipboard.
2
To copy a single document, right-click on the document and select Copy to Clipboard.
3
To copy a selection of documents, hold down 'Ctrl' or 'Shift' and select the required documents. Holding down 'Ctrl' will add each selected document to the current selection. Holding down 'Shift' will add each selected document and all the documents between it and the last one selected. Once the selection has been made, right-click on one of the chosen documents and select Copy to Clipboard.
4
If a colour image is selected, an option appears to choose whether to convert it into a smaller blank and white image.
5
Select the 'Paste' option within your chosen application to paste the copied documents into the application.
KB010 - Advise regarding corruption on Firebird database
This document is only applicable to installations that use the Firebird database software. In the event of any messages which refer to corruption or ‘internet GDS check’ please contact Watermark support.
Otherwise, please forward screenshots of the error messages and also a copy of the Firebird log from the server in the following location:
c:\program files\firebird\firebird_x\firebird.log
KB011 - Functionality to export a client list from Volume
A client/file list can be produced in most popular file formats such as Excel or CSV for example. A scanning bureau may require this list to match paper files with the file IDs stored in Volume.
1
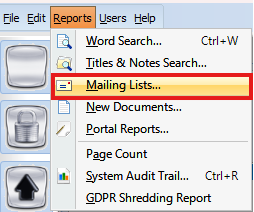
Open Volume, select the 'Reports' menu then ‘Mailing Lists’.
2
Select the filter as appropriate or leave everything blank to select all available files. Click ‘Apply Filter’.
4
Click Next.
For scanning bureaus, select ‘CSV File’ and Start Export. Or alternatively, you may wish to export to Excel.
KB012 - The message ‘The database is currently being upgrade by someone else, please try again later’ is shown
During a software update, Pack or Index Rebuild the message ‘The database is currently being upgrade by someone else, please try again later’ is shown.
Make sure that the pack or index rebuild has completed before performing the actions listed below.
The following should be only attempted by your IT support. To unlock the database and allow access run the following command from any machine on the network with Volume installed:
KB014 - Guide to recovering a client files paperwork that was removed in error
1
If a file is deleted, its documents are sent to the recycle bin of the same user who performed the delete. For easy viewing, the documents are held in the recycle bin in date order of when they were deleted.
Using the shift key, multiple entries in the recycle bin can be selected and restored. When the original client file has been deleted, the restore will always be to the user’s ‘Pages to be placed'.
2
Recreate the file either by using the integration with the back-office/CRM system where the client file will be created automatically, or by manually creating it.
3
Apply the template to create its tabs and rows, and drag the restored document boxes back in from ‘Pages to be placed’.
To provide the best experiences, we use technologies like cookies to store and/or access device information. Consenting to these technologies will allow us to process data such as browsing behaviour or unique IDs on this site. Not consenting or withdrawing consent, may adversely affect certain features and functions.
Functional
Always active
The technical storage or access is strictly necessary for the legitimate purpose of enabling the use of a specific service explicitly requested by the subscriber or user, or for the sole purpose of carrying out the transmission of a communication over an electronic communications network.
Preferences
The technical storage or access is necessary for the legitimate purpose of storing preferences that are not requested by the subscriber or user.
Statistics
The technical storage or access that is used exclusively for statistical purposes.The technical storage or access that is used exclusively for anonymous statistical purposes. Without a subpoena, voluntary compliance on the part of your Internet Service Provider, or additional records from a third party, information stored or retrieved for this purpose alone cannot usually be used to identify you.
Marketing
The technical storage or access is required to create user profiles to send advertising, or to track the user on a website or across several websites for similar marketing purposes.






 #
#