KB055 - Office Integration reports 'Unable to connect to Volume. Make sure you have logged in' error
Volume Office Integration installs a Volume Integration toolbar within Microsoft Word, Excel and Outlook. When clicking on the integration buttons on this toolbar, the below error may appear:
Please follow the guidelines below in order to rectify this issue.
Please Note: For instructions on how to install the Volume Office Integration add-in and for details on resolving other issues please see the knowledge base article found here
1
Log into Volume as the superuser.
2
Select 'File' and then 'System Setup'.
3
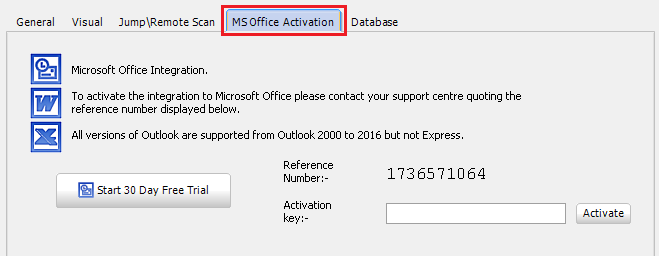
Select the MS Office Activation tab. This tab will either show that the Office Integration trial has elapsed or a 30 day trial is available.
A 30 day free trial can be activated by clicking on 'Start 30 Day Free Trial'. Office Integration will now operate for 30 days. The error 'Unable to connect to Volume. Make sure you have logged in' will no longer appear for the 30 day duration. Please contact your Account Manager for Office Integration training.
If the trial period has elapsed and you wish to continue using Office Integration, please contact your Account Manager to arrange for permanent activation.
KB039 - Packing a database to maintain reliability and optimal performance
Packing a database on a regular basis will ensure database reliability, maintain optimal performance and may also repair minor errors. The pack process is split into 2 parts, a backup and then a restore. Each step is automatic and forms part of the whole process. Once a pack has been started, no further interaction is required. Approximately 15-30GB per hour will be processed however this is dependent on disk and hardware speeds and the configuration of the server.
It is recommended that a pack is performed between 1-3 months. The higher the database usage the more frequently the pack should be performed.
This article is only applicable to installations that use the Firebird database software. The database can be packed manually when logged into Volume, or from a command line which can be incorporated into a batch file and scheduled task to automate the process.
Prerequisites
Firebird must be on version 2.5.2 or above. Details on how to upgrade Firebird can be found here.
Volume must be on version 5.5.1.4 or above on the server and clients. Contact support support@watermarktech.co.uk for details on how to upgrade Volume.
If the tool reports issues regarding 'missing GDPR defaults' or 'Default values missing from the document table', cancel the pack and get in touch with Watermark Support to investigate further.
1
To pack a database manually in Volume, first log into Volume as the superuser.
2
Select 'File' and then 'System Setup'.
3
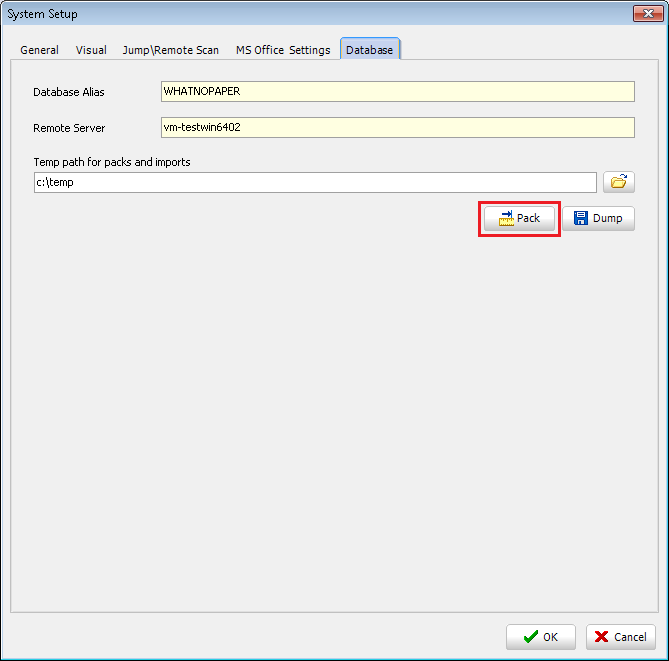
The first part of the pack process is the backup which copies all data held in the database to a separate temporary file. The default location for this file is c:\temp\ however this can be altered. The location must have enough free space to hold a copy of the database. A pack can be performed quicker if the location is held on a separate internal disk to that of the Volume database. For optimal performance it is recommend to always have the path pointing to a location on the server. The location can be specified in the below field which resides on the 'Database' tab in System Setup.
4
Select 'Pack' to begin the pack process.
5
Read the confirmation message and click 'OK' once happy to proceed.
6
Once the pack has started a status window is displayed. System usage for users will not be interrupted during the backup part of the pack process, although it is recommended that users do not use Volume whilst the pack process is running. When the pack process begins the restore part of the pack process, all connections to the database will be closed. The pack process will forcibly terminate all connections that are open and users will be disconnected from Volume.
7
Once the pack is complete, the information contained in the status window is written to a log file (wnp_pack.log). This log file is stored in the same location as where the temporary file is stored during the pack process.
Automating the Pack Process
The pack process can be automated using a batch file and scheduled task. Volume needs to be on version 5.5.1.4 or above.
1
Create a new batch file called watermark_pack.bat.
Edit the batch file to:
1) Temporarily disable the backup scheduled task which triggers the batch file watermarkbackup.bat.
2) Temporarily disable any other scheduled tasks that may exist which interact with the Volume database.
3) Trigger the pack.
4) Re-enable the backup scheduled task which triggers the batch file watermarkbackup.bat.
5) Re-enable any other scheduled tasks that may exist which interact with the Volume database.
In order to trigger the pack in the batch file, include the following line for the relevant version of Windows:
32 bit version of Windows - "c:\program files\watermarktech\volumeFINANCE\volumeFINANCE.exe" /pack
64 bit version of Windows - "c:\program files (x86)\watermarktech\volumeFINANCE\volumeFINANCE.exe" /pack
2
To calculate the length of time required to perform a pack, run a manual pack first using the instructions provided above. The pack log file (wnp_pack.log) will indicate the start and end times.
3
Create a scheduled task to run the watermark_pack.bat after the Volume backup has completed. Make sure it does not collide with the backup process batch file (watermarkbackup.bat).
4
Regularly monitor the backup and pack log file to make sure they are completing successfully.
KB021 - How to create Windows folders and files based on the database contents for LAN installs
Dump database contents to disk as Windows files. This process will create Windows folders and files based on the database contents. One folder for each file is created, retaining the file name as the folder name. Each file is copied to the folder in its original format (PDF, DOC and TIF for example).
This process will take a considerable amount of time depending on size of data and speed of server and is best run outside office hours.
1
Open Volume, select 'File', then click on 'System Setup'.
2
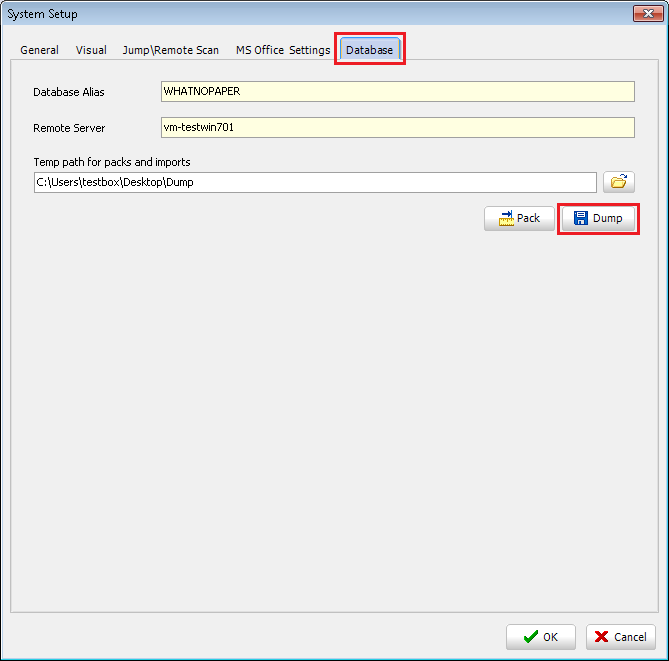
Select 'Database' tab and then 'Dump'.
3
Select a destination location. This location must have enough free disk space to hold the entire contents of the database.
4
The next popup will ask if you wish to limit the extract to a cabinet, to do this click "Yes" and then enter the cabinet ID. Cabinet ID can be found on the 'Modify Cabinet' screen.
Otherwise select "No" to extract everything within the database.
The extract will then start and display a progress bar.
KB065 - Guide to locking row's in Volume to prevent misfiling of documents and aid compliance
New feature introduced in v5.6.2.0
When applying file structures to a file it is sometimes important to restrict what a user can do with the applied structure to prevent misfiling of documents.
When a series of tabs, rows and document boxes are applied rows can be locked and no new boxes can be added to the row; existing document boxes cannot be removed or deleted. This feature keeps filing consistent restricting users from changing document box layouts.
A locked row only allows pages to be merged\inserted into existing document boxes within the row. The boxes within the row cannot be moved outside of the row, merged together or deleted. Paperwork within the boxes can be moved around the system freely.
Configure Row locking via a template
Enter template maintenance, a new option “locked row” has now been added at row level:
Locked rows in action
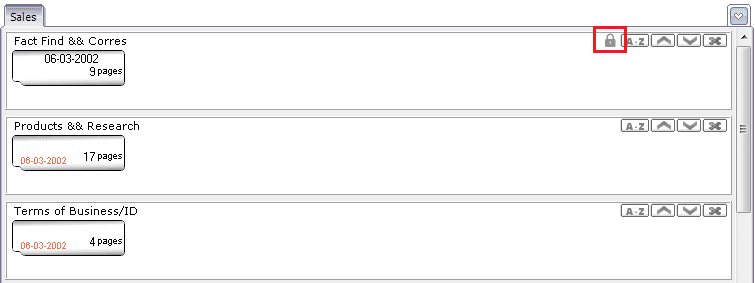
When the template is applied which includes a “locked” row, a padlock is added to the row to show that it is locked:
If a standard user tries to delete a box, move or merge a box that is part of a locked row they will receive the following warning:
The above warning will also be displayed if they try to add another box to the locked row. These settings can be overwritten if the user has access rights to do so (see “override settings” below for details on this feature)
The users can however move paper into the existing boxes, merge boxes from another row into an existing box or move paper within a locked row out of the box.
Override settings
The row locking mechanism has user configurable options to allow certain users to override row locks if required. These options are configured in User Maintenance, and are “modify locked rows” and “lock/unlock rows”
“Modify Locked Rows”
This option allows a user to override the locks, i.e. they could delete a box from a locked row. This comes with the following warning first:
If the user bypasses the row lock, this is fully audited to show the action under the audit type of “useroverride”:
“Lock/Unlock Rows”
This allows the user to either lock or unlock rows. This is done within the row properties by setting the “locked” check box:
A row can be locked within Volume external to a given template.
Please note if you wish to give users this feature you will need to amend their permissions in User Maintenance.
KB001 - This KB shows how to add an Outlook signature to emails in Volume
Due to the limitations of Microsoft’s MAPI interface, Volume cannot open a new email and apply the associated email signature created in Outlook. The workaround is to apply the signature manually.
The example shown below may differ depending on which version of Microsoft’s Office is installed. Please consult Microsoft’s documentation for further information.
1
Open Volume and locate the document you want to email. Right click the selected document and select ‘Email Pages'.
2
A pop-up will appear. Here you can either enter your signature manually or select 'Apply default signature'.
3
Then click 'Send'
NB: For colour images the option to send as a smaller black & white image is given.
3
The Outlook interface will automatically open with the relevant file attached including the attached document.
KB063 - Allows users to apply a colour to the tabs within Volume
From version V5.6.2.0 it is possible to apply a colour to the tab heading.
1
Double click the relevant tab to view the properties:
2
Pick the desired colour form the “Tab Colour” drop down:
Colour is then applied at a tab name level:
To remove the colour simply follow step 1 again and then select “None”
KB077 - Preview additional file types within Volume
By default Volume automatically previews TIFF and JPEG documents contained within a box. For other type of documents an icon is displayed instead of a preview.
When trying to view the document within the Volume document viewer the following message is displayed.
New functionality was introduced in Volume 5.6.1.0 which now allows additional file types to be previewed within Volume. These additional file types can be previewed within a popup preview window as well as in the Volume document viewer. By default this advanced preview functionality is disabled.
Please Note:
The ability to preview additional file types within Volume is only as reliable as the external software producing the previews. If you experience any errors or issues with a particular document type, or the previews are not being generated, then it’s best to disable previewing for that particular file type as detailed below.
Large documents may slow down Volume when trying to preview them within Volume. This is because the document has to be loaded in its entirety before it can be previewed. In this case it is recommended to limit previewing to known small file types.
1
To enable the previewing of additional file types in Volume, select Users then User Profiling.
2
Select the Settings tab. Tick ‘Client File Popup’ to enable additional file types to be previewed within a popup preview window. Select ‘Document Viewer’ to enable additional file types to be previewed within the Volume document viewer.
3
Choose which additional file types to preview within the popup preview window and document viewer by ticking the appropriate file types. To disable previewing for a particular file type, untick the option.
Click 'OK' to save the new settings.
4
To use the popup preview window feature, hover the mouse cursor over the document. After a few seconds the preview pane will appear displaying the document. To enter the preview pane and use its controls, hold the space-bar down on the keyboard and move the mouse cursor into the preview pane. Then release the space-bar.
5
To preview the document in the Volume document viewer, right-click on the document and select Open Document.
6
Use the scroll bar or mouse scroll wheel to view the full document. Click Next and Prior to skip through the documents and view their contents.
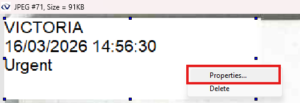
Allows the option to stamp JPEG and Tiff images with the user name, date of change and free text to annotate the image.
To amend the text, right click it and click 'Properties'.
Version control has also been added to this feature.
Version Control automatically creates version number to track changes.
KB003 - Removing paperwork out of the database
Note: It is recommended a backup is taken prior to starting the archive.
Note: Firebird database only: Once the archive is complete a Pack will need to be performed to regain the space and physically reduce the database file size. See Knowledge Base for information on how to ‘Pack’ a Firebird database.
Archiving removes the paperwork (Tiffs, Jpegs, Word, Emails, etc) out of the database into a static non-database archive file. The archive file can be stored on cheap network media such as a NAS box but still retain full read-only access to all data held retaining fast access speeds.
Archives can be restored in full or in part at single box level (right click on an archived box and select restore).
Once an archive has been created it cannot be added to.
There are no restrictions on archive size or number of archives held.
After an archive has been completed it is recommended that a Pack (see further documentation in the Knowledge Base) is performed to regain the space created by the archive making the physical database file size smaller. Only superusers and users who have been granted User Maintenance permission can perform an archive. Archives are best performed outside of office hours. Disable backups while the archive process is running.
1.
From the File menu select Archive Data. Four filter tabs are available. All filters can be applied simultaneously in any combination.
The first filter is by cabinet. One or more can be selected.
2.
The second filter is by file. Single or multiple files can be added to the list to the right.
A CSV file can be used to import a predefined list of files. Only one column in the CSV is required listing the File ID (see Mailing Lists in the Reports menu).
The option to additionally filter on a Tab title can be used (bottom right). For example, ‘Data Import’.
3.
The third filter is by users’ recycle bins.
4.
And finally filter by date of each document box.
Note: Dates used are ‘up-to’ but not including.
5.
If unsure about storage space requirements, use the ‘Calculate required disk space’ prior to staring the archive.
It is recommended a backup is taken prior to starting the archive.
6.
When ready to start select a filename and destination. This destination should be accessible to all Volume users either by a mapped drive or UNC path.
A complete list of all historic archives is shown. The list contains the date of when the archive was taken, the user who performed it, its current location and a textual description of the filter that was selected when the archive was taken.
To restore an archive, select a historic entry from the ‘Archive History’ list and click the Restore button.
If the physical archive’s location needs to be moved on the network select it in the History list and click the ‘Move archive’ button and select its new location.
Documents that have been archived are read-only and appear as shown in the above example.
7.
Right clicking on an archived box gives the option to restore a copy to ‘Pages to be placed’.
Note: Archives can be taken during normal working hours but this may affect performance for Volume users.
Firebird database only: Once the archive is complete a Pack will need to be performed to regain the space and physically reduce the database file size. See Knowledge Base for information on how to ‘Pack’ a Firebird database.
The archive should be backed up and stored securely.
KB004 This guide shows how to set up a link from Adviser Office to Volume
This guide describes how to set up the link from IRESS's, 'Adviser Office' (v6.2.1 or greater) to Volume.
The link performs a jump from Adviser Office to Volume at client level. If the client does not exist in Volume, a new one is created.
If the client is modified in Adviser Office, the modifications are carried over in to Volume. Deletions are ignored.
1
From the Start menu on the server, select Programs > Adviser Office Utilities > Database Administration.
2
From the within the Database Administration module, go to the Preferences Menu and select System Options.
3
On the new screen that is launched, click the DMS tab and you should see the screen below:
4
Enter the path to Volume’s executable ‘volumeFinance.exe’.
Select ‘Client Reference’ from the dropdown list ‘Command Line Argument’.
5
In Client Management a new button will appear in the toolbar. This is used to jump to Volume and synchronise the client file’s details in Volume.
6
Inside Volume, select ‘1st Adviser Office’ from the menus. If Adviser Office is not installed this option will not be visible.
In this example, Adviser Office is using Microsoft SQL Server. Check 1st32.ini for the correct server and database names.
If a SQL Server instance is used this will need to be manually typed into the Server entry before the database list will populate correctly. E.g. Server\Instance
When ‘Join Clients to their Adviser’ is ticked clients are imported as files and advisers as cabinets. This will keep their relationship as defined in Adviser Office placing files (clients) in their cabinets (advisers). This option will have no effect if the client files already exist in Volume.
‘Merge DB’ can be used to alter the client reference prefixes in Volume. When an Adviser Office database name is changed from Main1st to Merged for example, click the Merge DB and enter the old and new names to rename client reference prefixes en masse. Without this update existing client files will be duplicated in Volume with their new database prefix.
If you are using Adviser Office for the first time and you want all clients from Adviser Office to be imported into Volume, press “Import”.
If however, you have lost the link for the jump from Adviser Office and you are reconnecting, click “Close”
Eg. Main1st1000100 -> Marge1000100
Please note that the Database dropdown list has to be selected in order to save the server name.
7
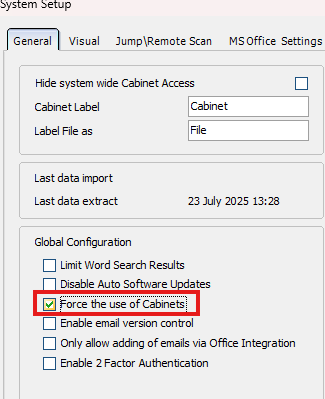
There is a global option in Volume that will prevent the users from creating files that are not in a cabinet.
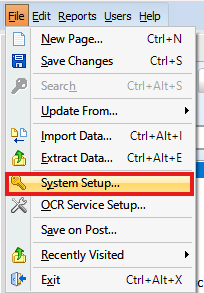
From the File menu select System Setup.
Tick the option ‘Force the use of Cabinets’ found in Global Settings.
When the user is prompted to create a new client file they also have to select a Cabinet to place the file into.
To provide the best experiences, we use technologies like cookies to store and/or access device information. Consenting to these technologies will allow us to process data such as browsing behaviour or unique IDs on this site. Not consenting or withdrawing consent, may adversely affect certain features and functions.
Functional
Always active
The technical storage or access is strictly necessary for the legitimate purpose of enabling the use of a specific service explicitly requested by the subscriber or user, or for the sole purpose of carrying out the transmission of a communication over an electronic communications network.
Preferences
The technical storage or access is necessary for the legitimate purpose of storing preferences that are not requested by the subscriber or user.
Statistics
The technical storage or access that is used exclusively for statistical purposes.The technical storage or access that is used exclusively for anonymous statistical purposes. Without a subpoena, voluntary compliance on the part of your Internet Service Provider, or additional records from a third party, information stored or retrieved for this purpose alone cannot usually be used to identify you.
Marketing
The technical storage or access is required to create user profiles to send advertising, or to track the user on a website or across several websites for similar marketing purposes.