
Menu
Volume software allows users to jump from the xplan system directly into client files held within Volume. Volume also allows a full syncronisation to take place this adds and updated client files within Volume with their associated metadata. Before continuing speak to the Volume Support team to enable Xplan and migrate client reference numbers before the link will function.
Please use the hyperlink below to jump to the relevant section of the document:
Create the xplan export template
Running an export from XPlan and syncronisation with Volume
Jumping from XPLAN to client files in Volume
XPLAN Configuration Options in Volume
This is a one time task that will create the structure to export the relevant columns and metadata from Xplan to syncronise with Volume
Within Xplan navigate to Entire List

Select "Export Data" from the "Functions" menu

Within the pick list tick the following items:
Click "Save" and give the template a name e.g. "WTExport" and make it "Shared"

The template has now been completed, please see "Performing and xplan sync" to run and import this report.
Within Xplan navigate to Entire List
Then select "Functions -> Export Data" in the side menu

Select the "WTExport" Load Criteria from the drop down list.
Select "All listed Clients" to syncronise all clients or "Only selected clients" if only only a handful of clients are to be syncronise.
Select "Export", this will advise that a file will be downloaded and you will be notified when it is ready.

When downloaded, open Volume and access "File - Update from -> XPlan". Note: if this option is not available please contact support.

At this stage review the xplan Syncornisation options, see XPLAN Configuration Options in Volume for guidance on the configuration options available.

To syncronise the export select "Open Import File"

Navigate to the downloaded "Client Focus Export" zip file and select it


Once 100% is reached the data sync has completed, Close the form and the relevant client files should have been created\updated based on you selected options.

On first run the application will ask the user to specify the desired browser, this should be set to the browser that they operate XPLAN within.

To do this select the browser from the drop down list and close the form:

Note: Only one browser is supported at a time.
To alter the settings at a later date right click on the tray application icon  and select "Configure" to see the browser settings screen.
The jump is done using the VolumeXplanJump application. The application runs in the users system tray and can activate a jump at the click of the mouse or by using a hot key combination. When initialised it will open the relevant client file in Volume, if not found it will prompt the user allowing them to create the file.
To perform a jump, navigate to a client file in XPLAN and either double click on the tray icon or press "Alt" + "w". This will send the client details to Volume and attempt to open the client file if a match is found.
This section covers the options available within Volume to control the outcome of running a syncronisation.
From Volume click on the File menu, Update From then select XPLAN.
Do not change the default options without fully understanding their impact as this can cause unexpected results if incorrectly set.
1. Insert on sync - unchecked by default
Checked: Will insert clients based on Reference number within Volume.
Unchecked: No new clients will be inserted. This is to prevent insertion of clients into Volume with incorrect unique reference numbers which have not changed from a system prior to XPLAN E.g. Adviser Office
2. Enable partners on import – unchecked by default
Checked: Will insert clients (partners) that do not exist on the Volume system, and update.
Unchecked: Will exclude partners associated with the client file.
3. Link to Adviser —unchecked by default
Checked: Will create a cabinet based on the Adviser name and add the relevant clients to the cabinet
Unchecked: No cabinets will be created and clients will not be assigned\changed to a new cabinet
4. Disable name change on synchronise—unchecked by default
Checked: Don’t update client names. Used when Volume’s details are more up-to-date.
Unchecked: Use names held in XPLAN to update Volume.
Volume integrates with Intelliflo’s Intelligent Office system at client level. This integration can import new clients details and update existing ones. Deletions are ignored. It will also jump, in Volume, to the currently selected client file in Intelliflo.
From Volume click on the File menu, Update From then select Intelligent Office.
Do not change the default options without fully understanding their impact as this can cause unexpected results if incorrectly set.
Sync/Synchronise refers to ‘Client List For Mail Merge’ report as described below.
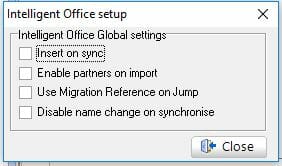
1. Insert on sync - unchecked by default
Checked: Will insert clients based on Reference number within Volume.
Unchecked: No new clients will be inserted. This is to prevent insertion of clients into Volume with incorrect unique reference numbers which have not changed from a system prior to Intelligent Office E.g. Adviser Office
2. Enable partners on import – checked by default
Checked: Will insert clients (partners) that do not exist on the system, and update.
Unchecked: Will exclude partners associated with the client file.
3. Use Migration Reference on Jump—unchecked by default
Checked: Old unique reference, prior to Intelligent Office E.g Adviser Office, is used.
Unchecked: Intelligent Office unique reference is used to match clients in Volume.
4. Disable name change on synchronise—unchecked by default
Checked: Don’t update client names. Used when Volume’s details are more up-to-date.
Unchecked: Use names held in Intelligent Office to update Volume.
The ‘Client List For Mail Merge’ report includes the column ClientCampaignSource. This specifies into which cabinet in Volume the client will be placed. ‘Other’ is the default and is ignored as a cabinet.
In this example, Marco Polo will be placed into a cabinet in Volume called MarkCabinet.

NB: Should this error message appear it usually means that the browser is missing a plugin supplied by Intelliflo

Prior to commencing the download of the import file, Volume should not be open, but the 'Insert in Sync' tick box, detailed above, should be ticked before closing Volume.
To perform a client list import select the ‘MI Reports’ option at the top of the screen.
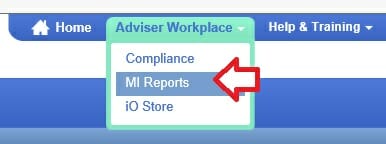
Select the report ‘Client List for Mail Merge’

Click ‘Run Report’. The popup search window is then shown. Click ‘CSV Export’ to run the report and create a CSV file.

When the report is complete save it to the Windows desktop retaining its original filename.

It is important to save the file to the desktop. This is where Volume will look for it.
Open Volume and login. Volume will prompt for a release word to import the list. Contact support@watermarktech.co.uk for the release word when prompted. This is necessary to stop unwanted updates.

The report will be imported automatically. Once compete the CSV file is then deleted from the desktop. If deletion does not happen then manually delete it and check Windows’ permissions.

With Volume loaded. In Intelligent Office, open the client to perform the ‘Jump’ to.
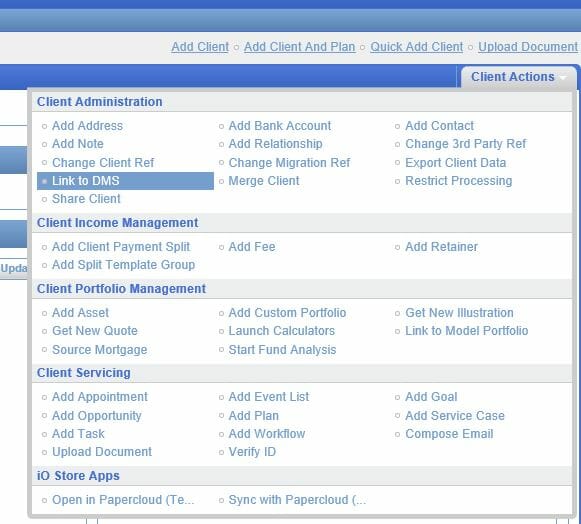
In the ‘Client Actions’ drop down list select ‘Link to DMS’. Contact Intelliflo if this option is not available.
A file is downloaded and Volume will then open the selected client. If the client does not exist in Volume a shell of the client is created containing only the client’s name and unique reference. To fully populate the client’s details run the ‘Client List for Mail Merge’ import as described in the above point 2.
Firebird reports ‘Failed to connect to the database. Machine actively refused.’
This document is only applicable to installations that use the Firebird database software.
Volume is reporting “Failed to Connect the Database. Machine actively refused.” can be caused by one of the following issues:
Check the Firebird service is running on the server. Open the windows 'Services' tool. (Services.msc). You should see two firebird services listed and they should both be 'Running'
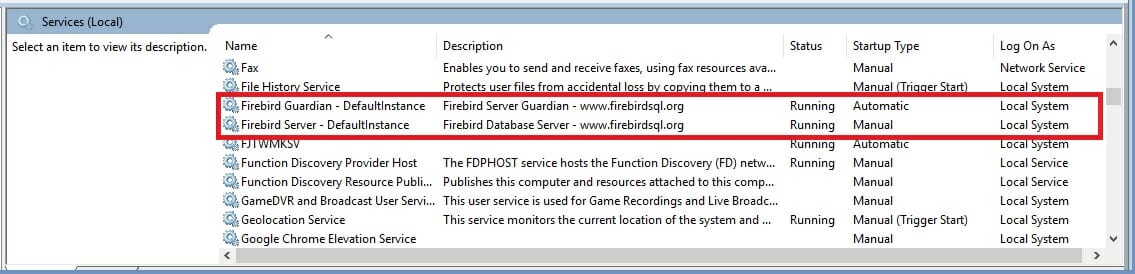
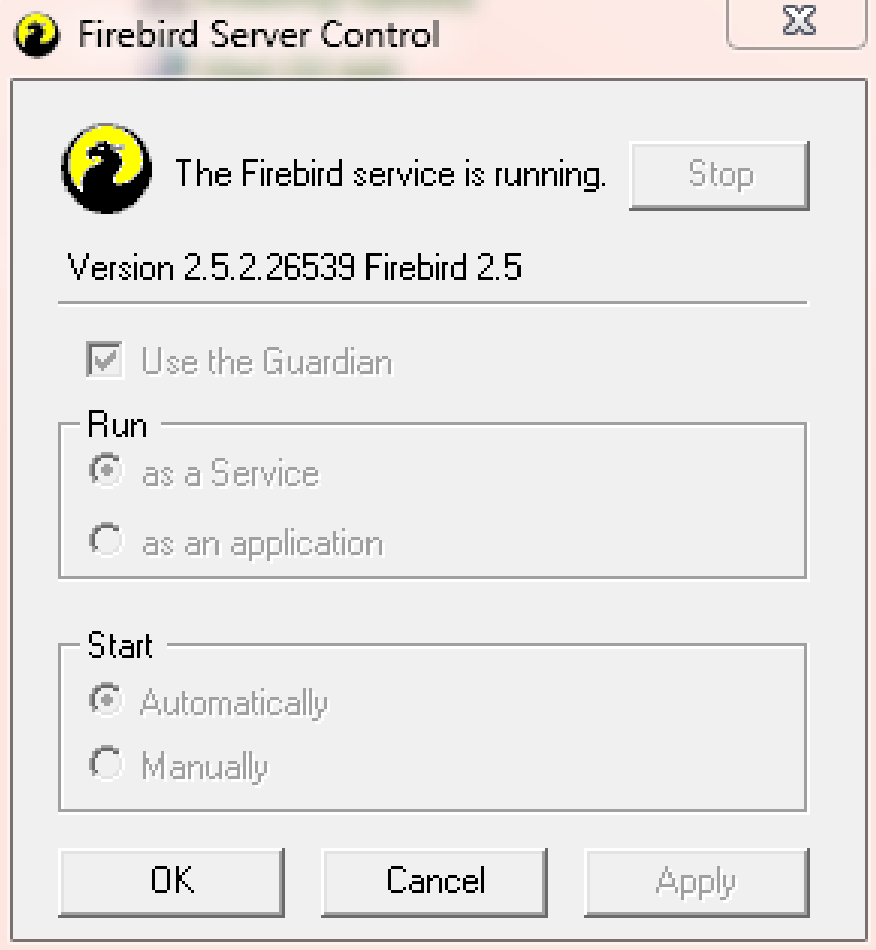
Check that the Firebird Servises settings are set as above i.e. Guardian is Automatic and Server is Manual.
Check the internal firewall on the server is open for the Firebird service on port 3050.
You can use our firewall test tool https://content.watermarktech.co.uk/download/FirewallTest.exe set the server to your server name.
Check the hosts file and make sure if the server is listed it is pointing to the correct IP address.
C:\Windows\System32\Drivers\etc\Hosts
A reboot of the server may be required.
Volume Integration toolbar is not shown or not working. The Microsoft Office Integration is an Add-in to Microsoft Office 2000 upwards (32bit and 64bit).
Depending on which version of Microsoft Office is installed the add-in will be shown either as a ribbon entry or as a toolbar.

The Integration add-in is only available for Outlook, Word and Excel.
If the add-in fails to appear or work correctly there are two options, but the first thing is to check the bit type of your version of Office. In Outlook, on the 'File' tab, click 'Office Account' and 'About Outlook'. On the screen that appears you should be able to see if it is 32bit or 64bit.

If it is 64bit please follow these steps before moving on to the options below
If it is 32bit you can move on to the options below.
The first option is as below:

The second option is:
If the two options mentioned above do not work you may need to reduce the 'User Access Control' level on the PC. Open the 'Control Panel' and type 'Change User' in the search box. Please consult your IT support before taking the actions in the following Instructions to change the 'User Access Control' level.

Take a note of the current level and then drag the slider down to 'Never notify'

You may need an administrator password to complete this step. Once at the lower level please try Option 1 from above again and then return the 'User Access Control' level to it's previous setting.
If the add-in still fails to appear, please check to see if the dll has been registered.
In Outlook or word go to the add-ins page, this will be different in different versions of office.
Set the ‘Manage’ drop down at the bottom of the screen to ‘COM add-ins’ and click go.

If the dll has been registered your should see the add-in 'CoOI_Volume' if it does not have a 'tick' please enter a tick and click OK.

The Volume integration toolbar should now appear.
If Volume appear to have taken over control of the screen or if documents and pop-up appear behind Volume so you cannot see or click on them, Volume may be running 'Maximised'.
Symptoms:
After login, your PC background is all Black.
Documents open behind volume and cannot be clicked on.
'Question' / 'Dialog' boxes open behind volume and cannot be clicked, so volume appears to freeze while it waits for you to click.
To solve the problem we need Volume to launch as ‘Normal’.
There are 3 common ways to launch Volume:
1. Desktop Shortcut
2. Taskbar Shortcut
3. Start Menu Icon

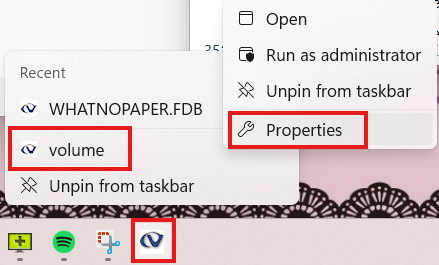
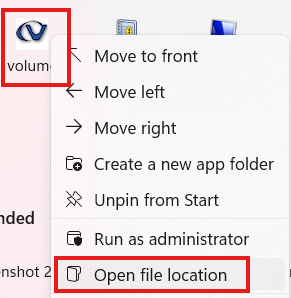
Setting all the shortcuts to Normal should stop Volume opening in Maximised mode so files/messages etc do not get hidden behind volume.
New feature introduced in v5.6.4.0
All machines must be upgraded to version 5.6.4 in order to use the Shredding option without issues.
1-Click on tab (e.g tab A)
2-Mark for shredding
3-Add Comment

All boxes show that they have been added to the shredding queue.

Content of box now reflects the change:

1-Click on row title (e.g Y)
2-Mark for shredding
3-Add Comment

All boxes show that they have been added to the shredding queue.

Content of new box now reflects the change:

1-Right click on images (e.g Word Document)
2-Mark for shredding
3-Add Comment
4-Save


Content of the box now reflects the change

Go to the GDPR Shredding Report, held within Reports.

Review the entries in the list and select entries recorded.

Either shred,

Or revert:

1 - Enables User to mark images for shredding

2 - Enables user to shred images

3 - Enables User to shred images irrespective of the cabinet they have originated from. The images may have been held within a cabinet to which this user does not have day/day access.

Note: In order for a User to “Mark items for shredding” the password must be at least 5 characters, cannot match the User Name and cannot be Password.
When a logon is no longer required, the Volume system allows user accounts to either be deleted or marked as inactive. Making a logon inactive is preferred over a delete as this will retain the users history. The below guide will cover both options.
From the Users menu, select User maintenance, select the relevant user and select "Amend User".

Tick the 'Inactive User' option, then select 'OK'.

Only users without entries in their audit trail, mail box, and ‘Pages To Be Placed’ can be deleted. Once a user has some history they should not be deleted, but made inactive as above.
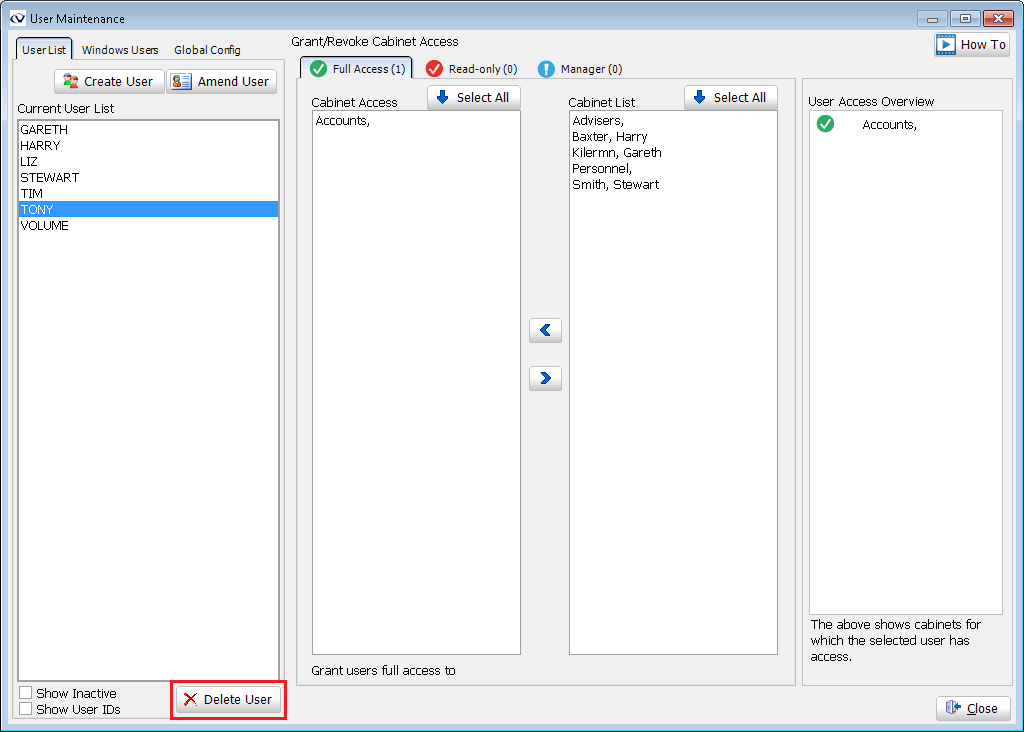
Highlight the user in the list and click ‘Delete User’.
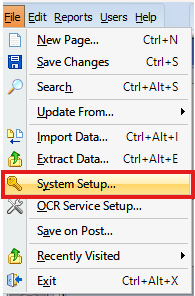
The cabinet option is switched off by default. To switch on Cabinets, from the File menu, select System Setup (superusers only).
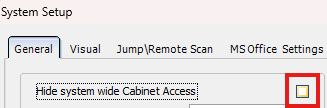
Untick ‘Hide system wide Cabinet Access’ found in the top left.
Some examples of cabinets might be HR, Accounts, Company and Clients.

From the Edit menu select ‘Add Cabinet’.

If your cabinet will reflect a person, i.e. an advisor, then enter the persons name. Otherwise, just enter the name you want in to 'Last Name'.
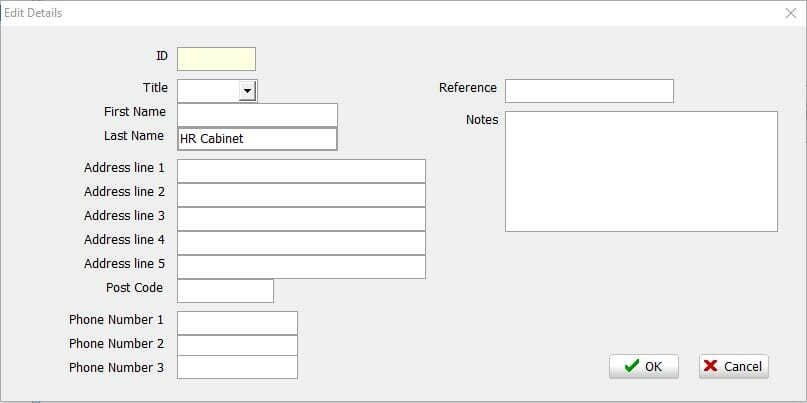
Then click 'OK'.
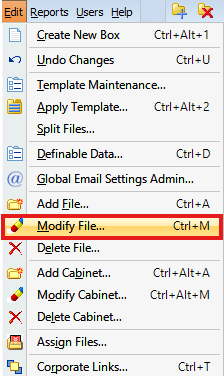
To place a single file into a cabinet, from the Edit Menu, select ‘Modify File’.
Click the Cabinet button and select the cabinet.

Click 'OK'.
To place multiple files into a cabinet in one go, from the Edit menu, select Assign Files. Assign Files is a configurable option in User Maintenance.

Search and select files in the left column and double click each one to place them into the right column.

Once the list of files had been created select a Cabinet. This is done via the 'Cabinet' icon. A pop up will appear - select the 'Search' icon. This action will populate the table with the relevant cabinets. Highlight the cabinet you require and click 'Ok'.
This will populate the field 'Assign Files to the Following'. Click ‘Assign’ to complete the operation.

Only users who have permission to view the selected cabinet will have access to its associated files.
To move the entire content of one cabinet to another, click the Cabinet tab in the top left. Select the source cabinet by double clicking on it to act as a filter. Click ‘Select All’, select the destination cabinet at the bottom and click 'Assign'. A confirmation window will appear - select 'OK'.

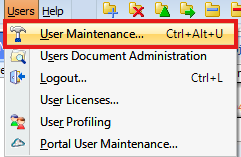
To grant access to a cabinet that contains files, select User Maintenance from the Users menu.
From the User Maintenance window, highlight the user in the 'Current User list' which require their cabinet access changing. Click the required cabinet in the Cabinet list and then use the left and right arrow button to grant and revoke access to the cabinet by moving it from the Cabinet list column to the Cabinet Access column or visa-versa.
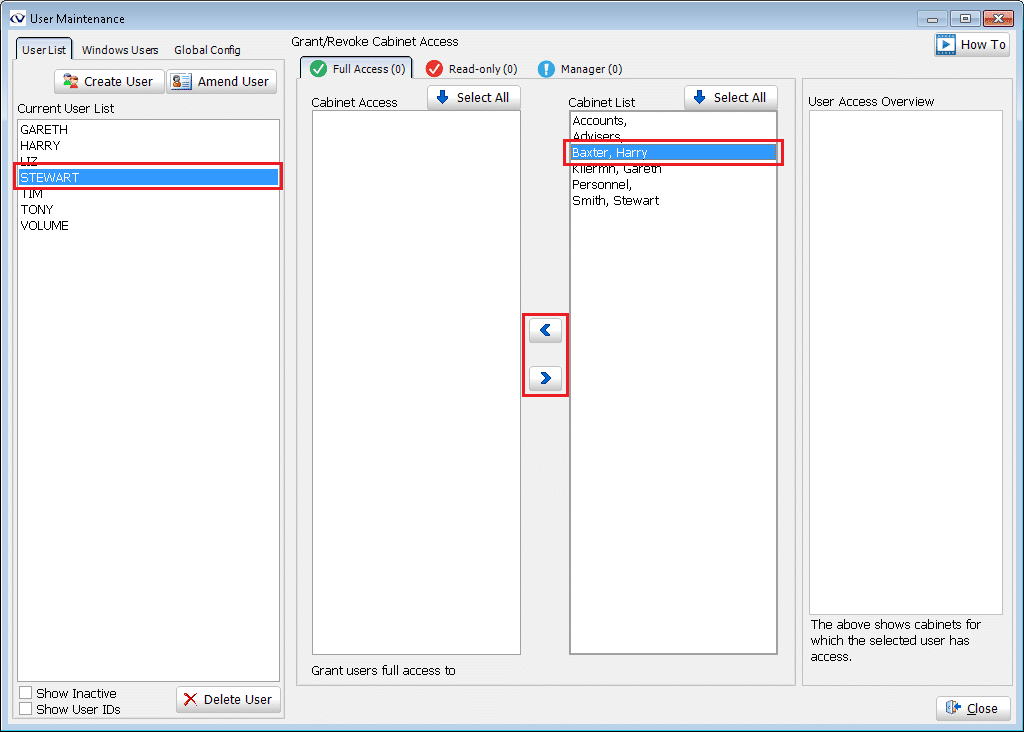
Use the Full Access and Read-only tabs to switch the Cabinet Access column between providing full access or read-only cabinet access to the user.

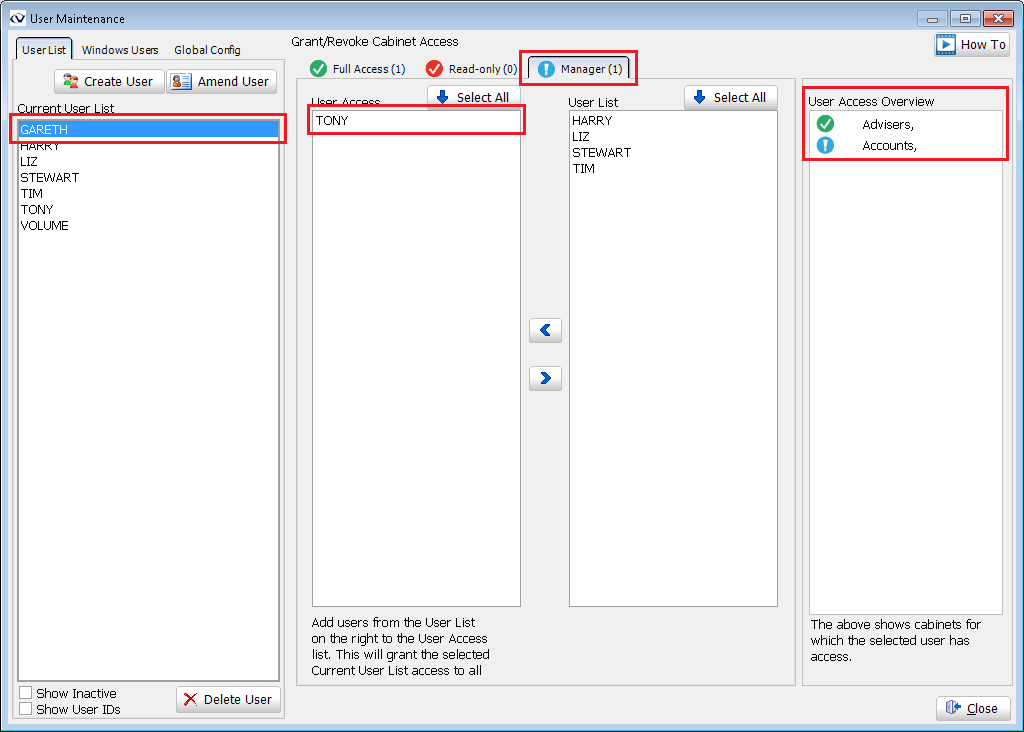
The Manager tab allows a user to be configured to have the same access rights to cabinets that a different user currently has access to. This is in addition to their own personal cabinet access rights. Select the Manager tab and then highlight the user in the 'Current User list' that requires the same cabinet access as that of another user. Select the required user in the 'User List' and then use the left and right arrow button to grant and revoke access to this user's cabinet by moving them from the User List column to the User Access column or visa-versa
In the example below Gareth has access to his own cabinets as well as Tony’s. The User Access Overview panel indicates the cabinets that Gareth has access to. In the example below, Gareth has full access to the Advisers cabinet. This is from his own personal cabinet access rights. He also has access to the Accounts cabinet. This is due to Tony having access to this cabinet and Gareth inheriting the same permissions from Tony.
A stand-alone scanner/photocopier/printer is known as a MFD (Multi-function Device). These are network connected devices that don’t require any TWAIN driver software installing on the PC to make the scanner operate. The scanner will store scanned documents into specified folders on the network.
Volume can be configured to detect scanned documents in these network folders. When a scanned document is created by the MFD, Volume will detect it and import it into the '...pages to be placed' area. Once imported, the scanned document contained in the network folder will be deleted. The network folders that Volume watches are referred to as ‘Hot Folders’.
Hot Folders can be configured in Volume by following the below guidelines. Volume 5.6.3 allows multiple hot folders to be configured. Previous versions of Volume only supports the configuration of two hot folders.
There are two ways to configure a Hot Folder:
The MFD will need to be configured for each user in order to identify their scanned documents. This is so the scanner places the scanned documents for that user into their relevant Hot Folder network location. Contact the MFD supplier on how to do this.
To configure the Hot Folder in Volume, select 'File' and then 'System Setup'.

From System Setup select ‘Jump\Remote Scan’ tab and select the plus button.
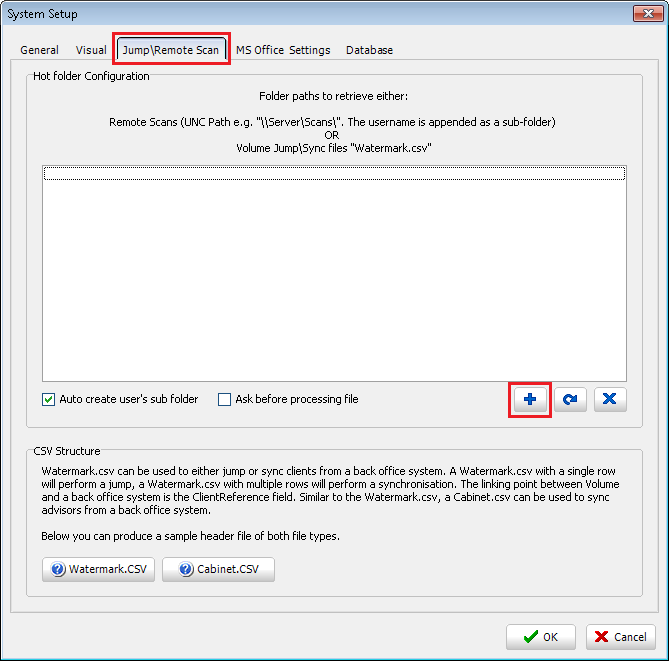
Enter the root path of the shared network folder as a UNC path. The path does not need to include the specific user's sub folder as this is automatically added by Volume.

Please Note: This network folder should have full permissions. As it is only a temporary folder, no permanent data will be held there.
Click ‘Create sub-folders now’ to create all user's sub folders within the shared network folder location based on the current list of users in Volume.
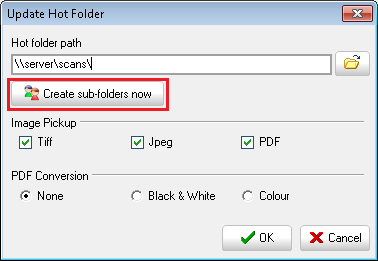
Tick the specific document types to be imported into Volume from the network folder.

It is recommended to set the scanner to Tiff for black & white and Jpeg for colour.
If the scanners creates PDFs, these can be converted to black and white Tiffs or Colour Jpegs by selecting the appropriate PDF Conversion settings. This will allow these documents to be viewed in Volume without the need for a PDF reader to be used - such as Adobe Reader. PDF documents can be left in their original PDF format by selecting 'None'.
Please Note: Colour PDF conversion is only available from Volume version 5.6.3
Select OK to save the settings.
8
Tick the option ‘Auto create user’s sub folder’ to automatically create the Volume user's sub folder within the shared network folder location. The sub folder will be named after the user's Volume username. The MFD will need to be configured to make use of any new sub folders created.

Tick ‘Ask before processing file’ for scanners that close and reopen the document file as pages are added. For these type of scanners, Volume will not be able to recognise when the document file is complete and the scanning process has finished. When this option is selected, the user is prompted first to confirm the document is ready to be imported into Volume.
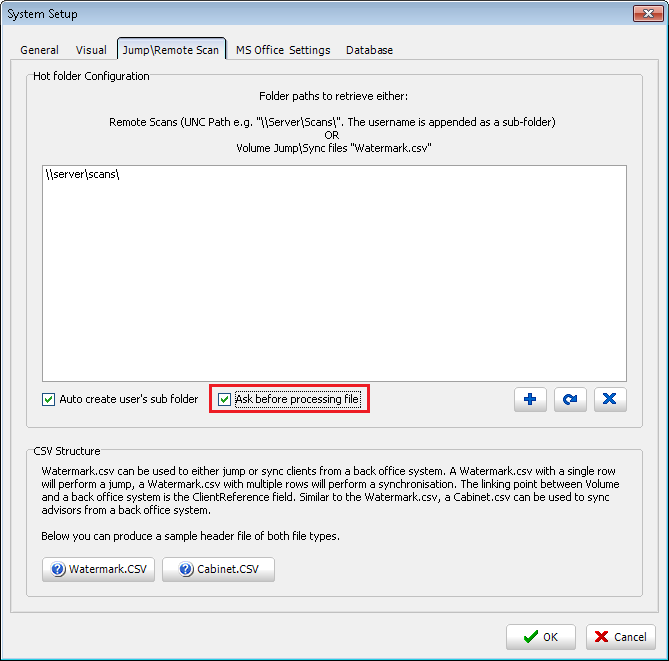
Use the Edit and Delete buttons to make changes to existing hot folders and delete hot folders which are no longer required.

The MFD (Multi-Functional Device) can be configured in a few different ways depending on requirements and its capabilities.
It is important that the correct compression and file type are selected otherwise Volume will not process the images. The TIFF file format can produce a single file containing multiple pages and should be selected in the options. This format will keep the pages in order. CITT Group 3/4 compression type is supported which will produce simple black and white images (not grey scale). LZW is also supported for TIFF where both black/white and colour images are both supported in the same multi-page file. If LZW is not supported then JPEG can be used. This must be set to True or Full colour.
Grey Scale is not fully supported so may not work correctly.
Some testing may be required to select the appropriate compression and image format. Your MFD supplier will have information on how to configure the scanner output.
Receiving an error: ‘Error processing page: cannot open file…’
This error is normally displayed when scanning from a Multi Function Device (MFD). A MFD usually takes the form of a large stand-alone photocopier positioned in the centre of the office. Due to the way these scanners create temporary image files Volume does not know when the scanning process has finished for multiple pages.
From the File menu, in System Setup, there is the option to wait before processing the newly created temporary image files.

Select the ‘Jump\Remote Scan’ tab and tick the option ‘Ask before processing file’.

When a new image file is created by the MFD, the user is prompted before processing begins.
Select 'OK', a window will appear to restart Volume for the changes to take effect.